Bathroom remodel punch list
A bathroom remodel punch list is the list of work still to fix or finish before a bathroom job is done and the final invoice goes out. The final walkthrough on a bathroom remodel is where the small misses show up: a caulk line that pulled away, a noisy exhaust fan, a door that rubs on the new tile. Work the bathroom in the same order every time - the wet areas first, then the fixtures, then the walls and ceiling - and nothing gets skipped. The JobsiteHQ bathroom remodel punch list below has 26 checks in 6 areas, ready to print.
Shower and tub
- Grout lines full and even, no pinholes or haze left on the tile.
- Flexible sealant, not grout, at changes of plane: tub to tile, inside corners, niche edges.
- Glass door or panel level, sweeps sealing, no water past the threshold with the shower running.
- Valve trim tight to the wall, escutcheon sealed at the top and sides.
- Hot on the left, temperature limit stop set, no knocking when it shuts off.
- Drain flows freely, no water standing at the curb or in the corners of a tiled pan.
- Niche and bench pitched to drain, no flat spots holding water.
Vanity and sink
- Vanity level and fastened to the wall; doors and drawers aligned and closing.
- Top sealed to the wall, side splash caulked with no gaps.
- Faucet tight to the deck, aerator clean, no drips at the base or spout.
- Supply lines and stops dry; trap tight with the sink full and draining.
- Pop-up or grid drain holds water and releases.
Toilet
- Toilet doesn't rock on the floor.
- Fill valve shuts off fully, no running or refilling on its own.
- Supply stop and line dry; seat and lid tight and lined up.
Floor
- Tile flat, no edges you can catch with a fingernail.
- Doorway transition secure and level with the next floor.
- Base trim or tile base finished and caulked; grout sealed if specified.
Electrical and ventilation
- GFCI outlets trip and reset, and every outlet they should protect goes dead.
- Exhaust fan quiet, damper opening, ducted outside - not into the attic.
- Lights on the right switches; cover plates straight and tight.
- Heated floor or towel warmer powered and holding temperature, if installed.
Walls, ceiling and finishes
- Clean paint lines at the tile, ceiling and trim; no roller marks in side light.
- Mirror, medicine cabinet, towel bars and hooks level and anchored.
- Door swings clear of the new floor height and latches without lifting.
- Touch-up and final caulk done after the final clean.
How do you use this checklist?
Print the 26-check bathroom remodel punch list from JobsiteHQ, or keep the page open on your phone, and walk the job in the order of the sections. Tick each line once you've checked the work. Anything that needs work goes on your own list, with the room and what's wrong. Hand your list to the trade who fixes the items, then walk the fixed items again.
How do you run the final walkthrough?
Start a bathroom walkthrough at the shower and tub, then the fixtures, then the walls and ceiling. Write each punch list item against the area where you found the problem. The 6 areas of the JobsiteHQ checklist above follow the same route.
- Run the shower for 2 or 3 minutes with the door closed before you start. Leaks at the 3 usual spots - the door, the valve and the curb - show up while you check the rest of the room.
- Check the tile with a flashlight held flat against the wall. Uneven edges and grout gaps that disappear face-on throw long shadows.
- Fill the sink and let the water drain while you look underneath at the P-trap. Most trap leaks only show with water moving.
- Trip every GFCI outlet and see which outlets go dead. Tripping each GFCI is the fastest way to find an outlet that isn't protected.
What gets missed on a bathroom remodel?
On a bathroom remodel, the misses are mostly the spots nobody looks at on the way out. The 4 items below are the ones that come back as a call after the final invoice.
- Where the fan really vents
- The fan runs and sounds fine, but the duct stops in the attic. Find the outside vent cap, or look in the attic, and check the fan label: 50 CFM is the usual minimum for a bathroom.
- Door clearance
- New tile raises the floor. A door that cleared the old floor can now drag or stop latching.
- Caulk after the clean
- Cleaners often pull fresh caulk. Do the last caulk pass after the final clean, and keep the shower off for the cure time on the tube - often 24 hours for silicone.
- Shutoffs behind the vanity
- A new vanity can box in the 2 shutoff valves. Make sure both stops, hot and cold, turn by hand.
How do you close out the punch list?
Closing out a bathroom remodel punch list means finishing every open item, showing the client the finished work, and handing over what the client needs to look after the work. The 3 steps below come before the final invoice.
- Fix the small items while you're still there: a hinge, a cover plate, a loose towel bar.
- Give the client care notes for the 3 finishes - tile, grout and glass - and leave spare tile labeled.
- Walk the open items with the client, then send the final invoice.
Skip the clipboard
Walk the bathroom remodel with JobsiteHQ open and say what you see, room by room. JobsiteHQ writes the punch list, sorted by area, for you to check over, then turns the list into a client summary, an estimate and an invoice. JobsiteHQ works with no signal.
Try it free for 14 days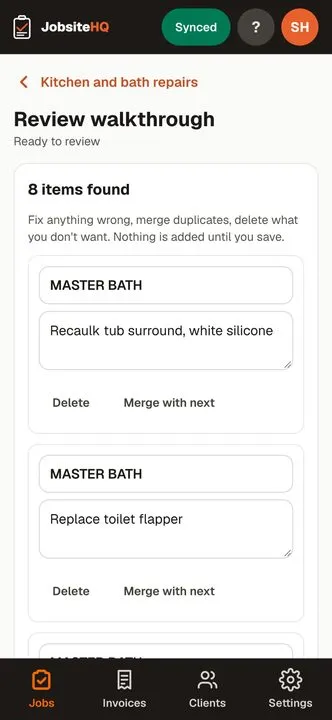
Questions
- What goes on a bathroom remodel punch list?
- A bathroom remodel punch list holds 5 kinds of work still to fix or finish before the job is done: leaks, caulk and grout touch-ups, fixture adjustments, paint and trim, and anything the client pointed out. Group the punch list by area so the tradesperson doing the work can finish one spot at a time.
- When should the final walkthrough happen?
- The final bathroom walkthrough happens after the last trade is out and the room is cleaned, before the final invoice. Record the walk with the client in JobsiteHQ, so the client's items land on the same punch list as yours.
- Silicone or grout in the shower corners?
- Most tile setters use a flexible sealant at changes of plane - inside corners and where tile meets the tub - because joints at a change of plane move. Follow the instructions for the tile and waterproofing system you used.