Drywall punch list
A drywall punch list is the list of defects to fix before paint: seams, fasteners, corners, texture and ceilings. Drywall punch lists are walked with a light, not a ruler. A flat, even surface is the whole job. The defects that matter only show when light rakes across the wall, the way a window or a fixture will. The JobsiteHQ drywall punch list below has 12 checks in 6 areas, ready to print.
Seams and joints
- No visible seams, ridges or crowned joints in side light.
- Butt joints feathered wide enough to disappear.
- No tape showing through or bubbling.
Fasteners
- No nail or screw pops; every fastener covered and flat.
Corners
- Inside corners straight and clean, no cracks.
- Outside corner bead straight, fully covered, no dents.
Surfaces
- Texture matching between new and existing work.
- No sanding scratches, dings or gouges.
- Tight cuts around boxes and fixtures, gaps patched so covers hide the edge.
Ceilings
- Flat with no sag between framing.
- Seams invisible from below with the lights on.
Ready for paint
- Dust cleaned off; surfaces primed where specified.
How do you use this checklist?
Print the 12-check drywall punch list from JobsiteHQ, or keep the page open on your phone, and walk the job in the order of the sections. Tick each line once you've checked the work. Anything that needs work goes on your own list, with the room and what's wrong. Hand your list to the trade who fixes the items, then walk the fixed items again.
How do you run the final walkthrough?
Walk each room with a work light held along the wall, then check from where the windows and fixtures throw light. The 6 areas of the JobsiteHQ checklist above follow the same route.
- Shine a work light along the wall from the side. Seams and pops invisible head-on throw long shadows.
- Check where the light will really come from: the 2 sources are windows and ceiling fixtures. Light from those 2 sources is what the client sees every day.
- Mark every drywall item with a pencil circle as you call the item out, so the finisher finds each spot without the list.
- Look at each wall from 2 heights, kneeling and standing. Ridges along a seam show up from below.
What gets missed on a drywall job?
On a drywall job, the misses are mostly the spots nobody looks at on the way out. The 7 items below are the ones that come back as a call after the final invoice.
- Closets and stairwells
- Closets and stairwells get the least attention from drywall finishers. Check closets and stairwells with the same light as the main rooms.
- Window returns
- Window returns pick up dents and cracked corner bead at the corners. Check the 2 outside corners of every window return.
- The wall-ceiling joint
- The joint where the wall meets the ceiling cracks easily. Look for gaps or uneven tape along the ceiling line.
- Late patches
- Electricians and plumbers cut holes after the first coat. Check every late patch got all 3 coats, like the rest of the wall.
- Dust in vents and boxes
- Sanding dust settles in vents, electrical boxes and window tracks. Vacuum all 3 before the painter starts.
- Fire-rated walls
- Where the plans call for fire-rated drywall, such as Type X board on some garage walls, check joints and holes are finished as specified.
- Behind doors
- The wall behind a door gets dinged by the door and the handle. Check the wall behind every door, and suggest a door stop if there isn't one.
How do you close out the punch list?
Closing out a drywall punch list means finishing every open item, showing the client the finished work, and handing over what the client needs to look after the work. The 3 steps below come before the final invoice.
- Circle each item in pencil and walk the list with the finisher.
- Prime and look again. Primer shows defects that bare mud hides.
- Sign off with the painter before the first coat.
Skip the clipboard
Walk the drywall job with JobsiteHQ open and say what you see, room by room. JobsiteHQ writes the punch list, sorted by area, for you to check over, then turns the list into a client summary, an estimate and an invoice. JobsiteHQ works with no signal.
Try it free for 14 days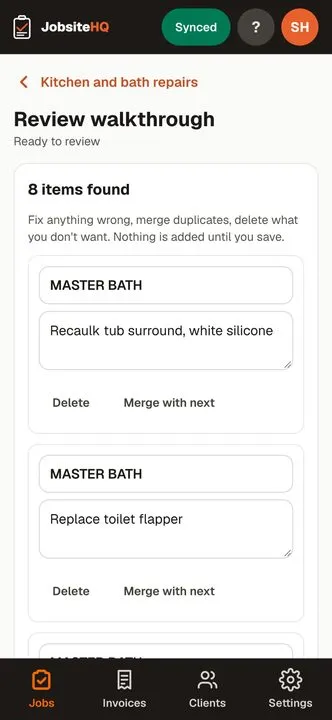
Questions
- What level of finish should drywall be checked against?
- Check drywall against the level of finish the contract specifies, from Level 0 to Level 5 in the Gypsum Association's GA-214. Higher levels of finish are usually called for where strong side light or glossy paint will show every flaw.
- Who should sign off on drywall before paint?
- The drywall finisher and the painter should sign off together before paint. A defect found after paint is harder and more expensive to fix.
- Why do nail pops appear after drywall is finished?
- Nail pops usually come from framing that shrinks as the wood dries and pushes the fastener out. Reset the fastener, add a screw about 1 1/2 inches from the pop, and refinish the spot.
- Should the client walk drywall before paint?
- The client can walk drywall before paint if the client wants to. Walk the drywall with a work light, so the client sees what the finisher sees, and note each spot in JobsiteHQ. Agreeing on a seam before paint is cheaper than after.
- How do you mark drywall items for the finisher?
- Circle each spot with a No. 2 pencil, not pen or marker. Pen can bleed through primer and paint.
- What's the difference between a nail pop and a screw pop?
- Nail pops and screw pops are the same problem to the client: a fastener pushing through the finish. The fix is the same: reset the fastener and refinish the spot.